The moment a kitchen cabinet order is placed, the next question arrives almost immediately. How does installation actually work? How long will the kitchen be out of commission? Should a professional installer be hired or is this something a confident homeowner can handle independently? What needs to happen before the cabinets arrive to make sure installation day runs without problems?
These are the right questions to ask before the cabinets ship rather than after they land on the doorstep. Kitchen cabinet installation is not the most complicated task in a home renovation, but it is one where preparation, sequencing, and attention to specific technical details determine whether the project finishes on schedule and within budget or turns into a costly, time-consuming correction exercise.
This guide covers the complete installation picture — what the process involves from wall preparation to final adjustment, when professional installation is worth every dollar, what a homeowner can realistically handle independently, and how to prepare the kitchen so installation day moves efficiently from start to finish.
Understanding the Installation Sequence
Kitchen cabinet installation follows a defined sequence that experienced installers execute in the same order every time. The sequence is not arbitrary. Each step creates the condition that makes the next step possible, and skipping or reversing steps creates problems that are difficult and expensive to correct once cabinets are in position.
The sequence begins with wall preparation and layout marking, proceeds through wall cabinet installation, then base cabinet installation, then the integration of specialty cabinets and fillers, and concludes with door hanging, drawer installation, hardware attachment, and final adjustment. A professional installation team working on a standard kitchen of fifteen to twenty cabinets typically completes the full sequence in one to two days. A homeowner working carefully with a helper might take a long weekend to accomplish the same result.
Understanding this sequence before installation day prevents the most common mistake homeowners make, which is attempting to install base cabinets before wall cabinets. Wall cabinets installed after base cabinets are in position are significantly harder to install correctly because the base cabinets and countertop obstruct the installer’s working position against the wall. Every professional installer puts wall cabinets up first. This is not negotiable.
Step One: Preparing the Kitchen Before Cabinets Arrive
The preparation work that happens before the cabinets arrive has as much influence on how smoothly installation proceeds as any other factor in the project. A kitchen that is fully prepared for cabinet installation allows an experienced team to work without interruption. An unprepared kitchen creates delays that accumulate quickly on a job where timing and sequencing matter.
Clear the kitchen completely. Every appliance that is not built in, every item on countertops, every piece of furniture, and every box or stored item in the room needs to be relocated before installation begins. The installation team needs unrestricted access to every wall and every floor position from the first moment they arrive.
If old cabinets are being replaced, remove them before the new ones arrive. Attempting to work in a kitchen where old cabinets are still partially in place while new ones are being installed is inefficient at best and impossible to execute correctly at worst. Old cabinet removal also reveals the wall condition behind them, which may require patching, repair, or in some cases, the relocation of electrical outlets or plumbing stubs that conflict with the new cabinet layout.
Inspect the walls for plumb and the floors for level before installation day rather than during it. Mark the high point of the floor along every cabinet run. This is the starting reference point for base cabinet installation, and knowing it in advance allows the installation to begin without the delay of remeasuring what should already be mapped.
Confirm that all utility work is complete. Any electrical outlets that need to be relocated, any plumbing that needs to be adjusted, and any blocking that needs to be installed in the walls for wall-mounted cabinets should be finished and signed off before the first cabinet arrives. Scheduling these trades to complete their work after cabinet installation has begun is one of the most common causes of kitchen renovation delays.
Step Two: Laying Out the Cabinet Positions on the Walls
Before any cabinet is lifted into position, every cabinet position is marked directly on the wall using a level, a pencil, and reference lines established from the high point of the floor and the desired finished height of the wall cabinets.
The base cabinet reference line is drawn at thirty-four and a half inches from the high point of the floor. This is the standard base cabinet height before the countertop is installed, and using the high point of the floor as the starting reference ensures that the base cabinet tops are level across the full run even when the floor is not.
The wall cabinet reference line is drawn at the desired finished height of the bottom of the wall cabinets. The standard installation position places the bottom of the wall cabinet at fifty-four inches from the floor, which provides eighteen inches of space between the top of the countertop and the bottom of the wall cabinet. This spacing accommodates a backsplash, small appliances, and comfortable work visibility at the counter surface. Some homeowners prefer a taller position at fifty-seven or sixty inches from the floor for additional counter clearance, particularly in kitchens used by taller adults or where large countertop appliances are frequently in use.
Stud locations are marked on the wall within the cabinet position. Every wall cabinet must be secured to at least two wall studs to carry the load of the cabinet contents safely over time. Every base cabinet should be secured to studs along the back rail for stability. Marking stud locations before installation begins rather than searching for them while holding a cabinet in position against the wall is one of the most time-saving preparation steps in the entire installation process.
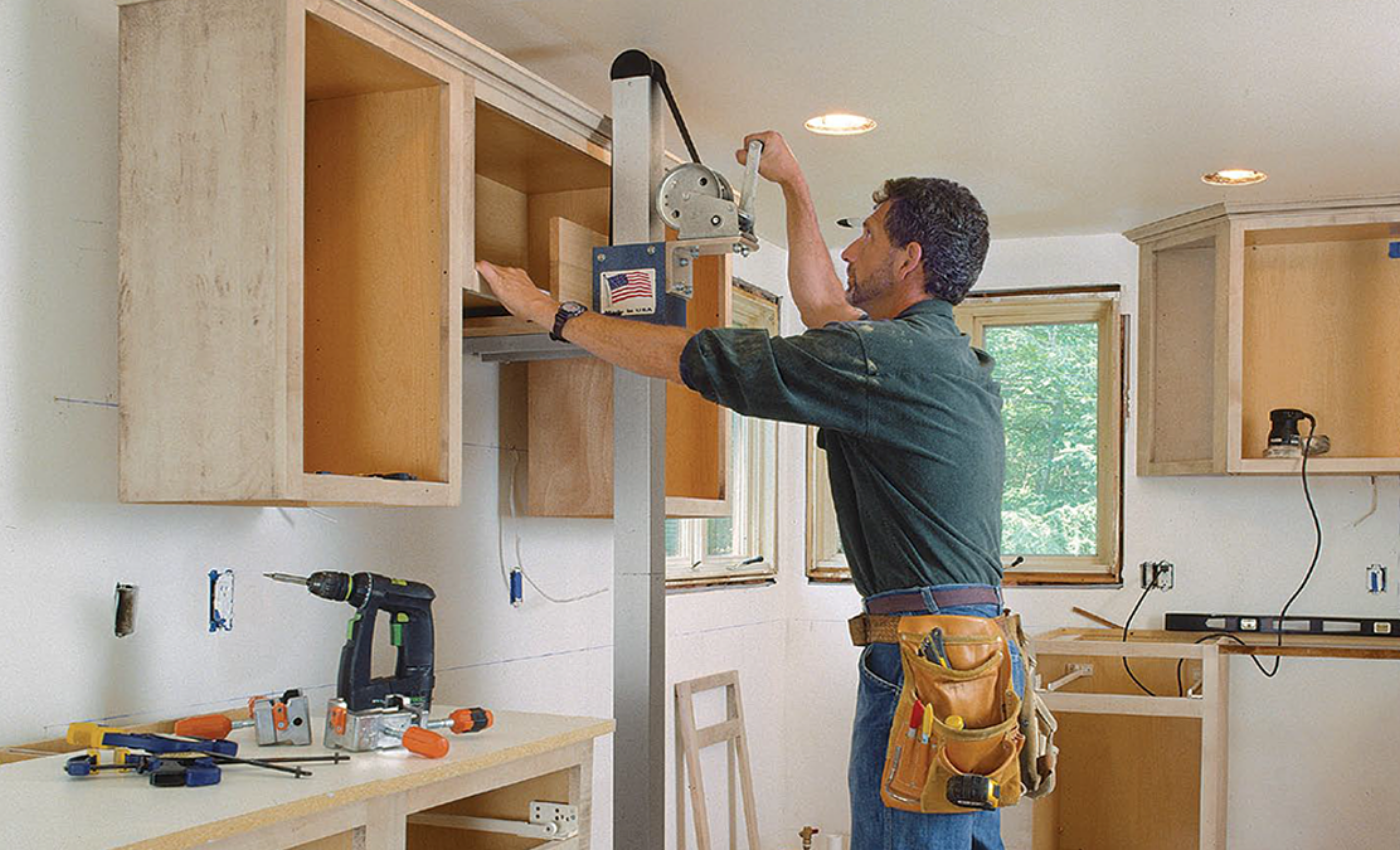
Step Three: Installing Wall Cabinets
Wall cabinet installation begins at the corner of the room and works outward toward the open ends of the cabinet run. Corner positions establish the reference from which all adjacent cabinets align, and any error in the corner installation compounds across every cabinet that follows it.
A temporary ledger board, which is a straight length of lumber screwed to the wall along the reference line, supports the wall cabinets from below during installation and allows a single person to position and secure a cabinet without requiring a second person to hold it in position throughout the fastening process. Professional installers use this technique consistently because it reduces installation time and improves accuracy.
Each wall cabinet is lifted onto the ledger, positioned against the wall with its top rail aligned to the layout marks, and secured to the wall through the back rail into the wall studs using cabinet screws of appropriate length. Adjacent cabinets are then clamped together at their face frames and screwed together before both are secured to the wall, which ensures a flush face frame alignment across the full run that is impossible to achieve if cabinets are individually secured to the wall without being joined to each other first.
The ledger board is removed after all wall cabinets are installed and secured, and any fastener holes in the wall below the cabinet installation are patched before the base cabinet installation begins.
Step Four: Installing Base Cabinets
Base cabinet installation begins at the same corner reference point used for wall cabinets and works outward along each run in the same sequence. The corner base cabinet is installed first, shimmed to level using the floor high point reference line, and secured to the wall through the back rail into wall studs.
Each subsequent base cabinet is positioned adjacent to the installed corner unit, shimmed to the same level reference, clamped to the adjacent cabinet at the face frame, screwed together, and then secured to the wall. The leveling step at each cabinet position is the most time-consuming part of base cabinet installation and also the most consequential. Base cabinets that are not level in both directions, front-to-back and side-to-side, create problems with drawer operation, door alignment, and countertop installation that are difficult and expensive to correct after the countertop is installed.
Sink base cabinets and appliance openings are positioned within the run according to the kitchen layout plan. The plumbing stub locations confirmed during the measurement phase determine exactly where the sink base sits within the run, and confirming that the rough-in aligns with the cabinet before the surrounding cabinets are secured saves the time and cost of adjusting cabinet positions after the run is partially installed.
Step Five: Hanging Doors, Installing Drawers, and Final Adjustment
With wall and base cabinets secured in their final positions, doors are hung on their hinges, drawers are installed on their glides, and hardware is attached to door and drawer fronts. This is the stage where the kitchen begins to look like its finished self rather than a construction site, and it is also the stage that requires the most patience for adjustment and alignment.
Soft-close hinges provide three-axis adjustment for up and down, left and right, and in and out positioning of the door relative to the face frame. Every door needs to be individually adjusted to align flush with adjacent doors, maintain consistent reveal gaps at the top and bottom of the face frame opening, and close squarely without any corner protruding forward relative to the door surface.
Drawer glides are adjusted for height and lateral position to ensure each drawer slides smoothly on its full-extension glide without binding and closes flush and square with the drawer front aligned consistently across the cabinet face. This adjustment process takes longer than most homeowners expect and is worth taking the time to complete correctly. Drawers that are slightly misaligned are an irritation experienced multiple times every day.
Final hardware attachment, touch-up of any finish marks from the installation process, and a complete operational check of every door and drawer conclude the installation.
When to Hire a Professional Installer
The honest answer is that professional cabinet installation is worth the cost for most homeowners in most kitchen renovation situations. The labor cost of professional installation, which typically runs between two thousand and six thousand dollars for a standard kitchen depending on the region and the complexity of the layout, is modest relative to the total cost of the cabinet and renovation investment, and the quality assurance that an experienced installer brings to the alignment, leveling, and adjustment work is genuinely difficult to replicate without prior installation experience.
A homeowner who has installed cabinets before, who has a competent helper available, who has the required tools including a drill, level, stud finder, cabinet clamps, and shims, and who can allocate three to four full days to the project can absolutely complete a quality installation independently. A first-time installer working alone in a kitchen with a complex layout, irregular walls, or unusual ceiling heights should strongly consider professional installation to protect the cabinet investment.
Our free design service includes consultation on your specific layout that helps you understand which aspects of your installation are straightforward and which require specific expertise before your cabinets ship.
👉 Get Your Free Kitchen Design and Installation Layout 👉 Browse Our Full Cabinet Collection 👉 Order Sample Doors and Review Before Your Install Date
The Installation Is the Final Commitment
Every decision made during cabinet selection, measurement, and design determines what gets installed. The installation itself determines how well those decisions perform over the life of the kitchen. A well-selected cabinet installed carelessly delivers a disappointing result. A quality cabinet installed with patience and attention to the alignment, leveling, and adjustment details delivers a kitchen that looks professional and functions flawlessly for decades.
Prepare the kitchen properly before installation day. Follow the sequence. Take the time to get every level reference correct before moving to the next cabinet. And if any stage of the process creates uncertainty, the cost of professional expertise is always less than the cost of correcting a mistake in an installed kitchen.